A Little Paint Goes A Long Way: 40 Creative Ideas To Upcycle Old Furniture
Whether you’re moving into a new space or just looking for a way to spice up your current space, transforming old furniture can be a fun and affordable way to add some personality to your home décor. With some creative juices and basic carpentry skills, you can give that tired dresser or bookcase a new life – and maybe even save yourself a few bucks in the process. You may need a few supplies and some time to work on the furniture pieces, but you’ll be happy with the result. So if you’re ready to give your old furniture a new lease on life, check out these ideas for your next DIY project. You might be surprised at what you can create!
1. Follow Boho style for chest of drawers
Boho style is all the rage right now if you’re looking for something to spice your bedroom without breaking any decor rules. You can find a plain teak unit like this at either a clearance sale or a charity shop that carries antique items.
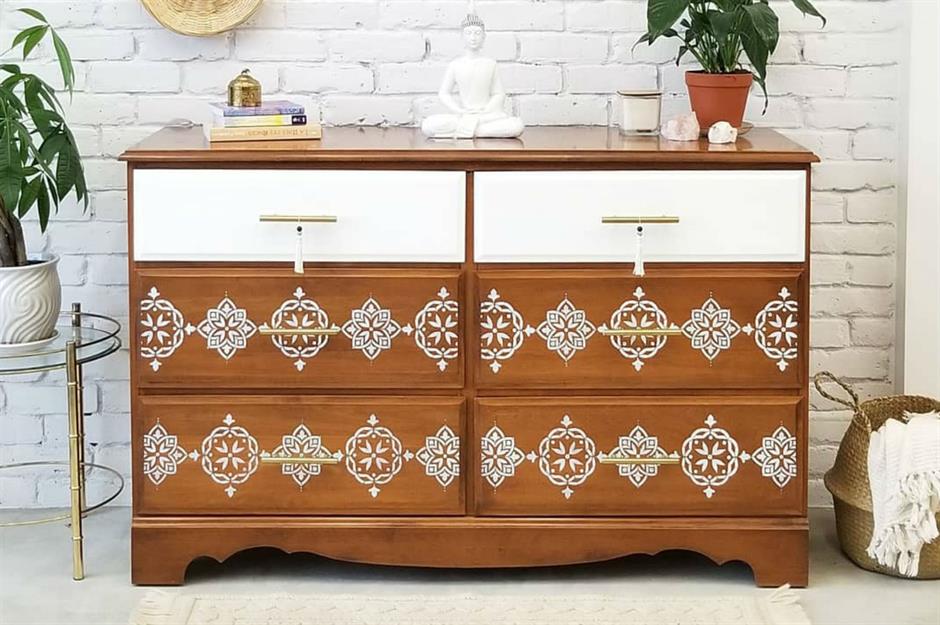
Give it some quick sanding and wipe it down before painting it. White is preferred because it goes best with most furniture styles. For the bottom drawers, apply mandala stencil detailing and use bright paint to create a contrast.
2. Create a retro palace for your pet
Who needs an expensive dog or cat house when you can make your retro pet palace? Head over to Vintage Interior’s page on Instagram for the instructions. It takes some careful removal of internal electrics from an old television to have a smooth shell.
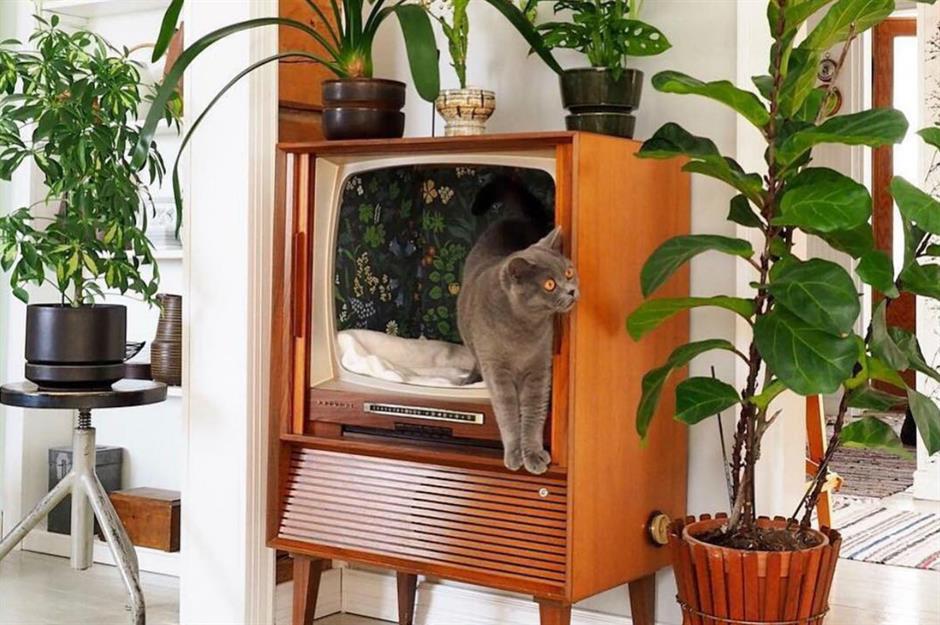
Use patterned wallpaper to line the inside and add a soft bed for your pet to rest on. This little house is the perfect place to keep your pet. It’s cute, cuddly, and looks so pleasing anywhere in the house. If you don’t have pets, you can also use this to store your stuff incredibly.
3. Add a silver leaf to elevate side tables
This DIY hack will save you some money and give your side tables a cool new look. Cover them up with silver leaf to create the perfect mirror-like reflection in every corner of your room. It’s an easy project that takes minutes.
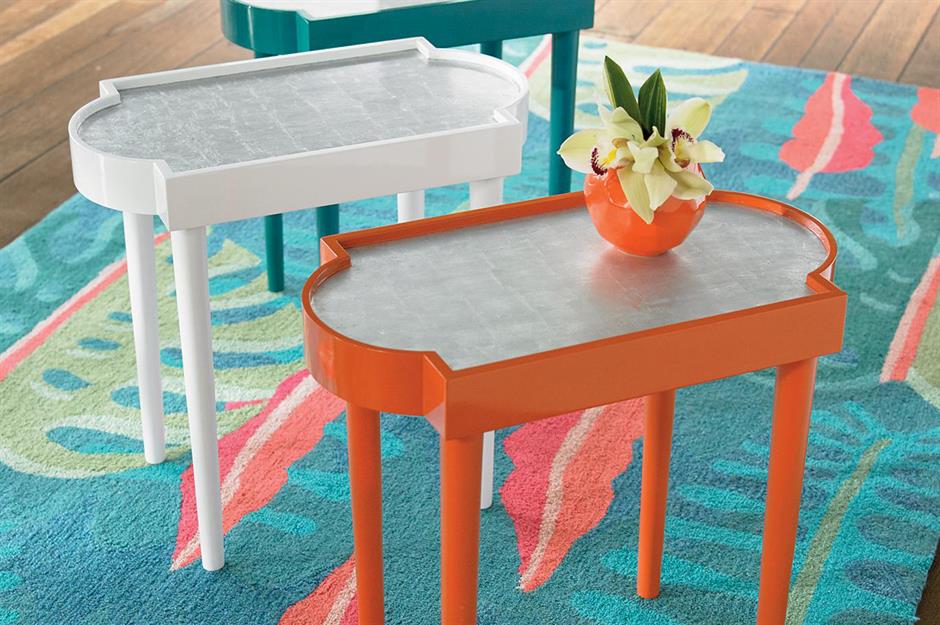
You can do this easily by spraying on some adhesive and covering the tables with leaves. Press it on to stick it nicely without any significant gaps. Add protective sealer as the last step to ensure it shines and stays in good shape.
4. Paint your old console
Give your console table a stylish makeover by giving it an updated look using warm paint. The top can stay in its original state. You can paint the base or just the legs with yellow chalk paint for an added flair.
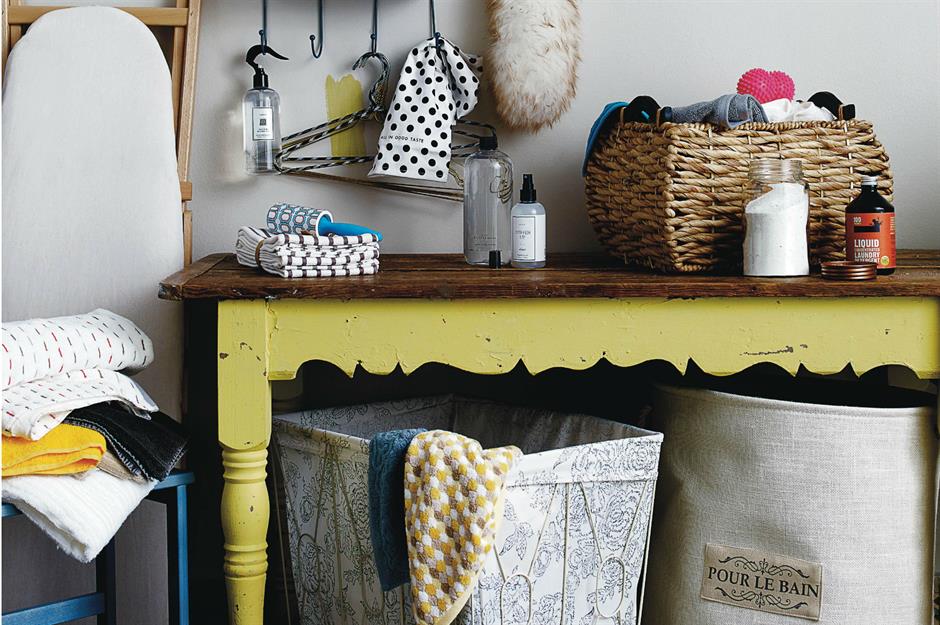
Yellow is a happy color that will add vibrancy to your room. If creating a rustic style is on your mind, then take this opportunity to dust off those paints and rough edges using sandpaper so they’re more chipped-looking.
5. Try your hands at doodling dining chairs
This pattern on your dining chairs will be a work of art! You can turn any plain, old white plastic seat into something special by doing this freehand project. Make sure that the chairs are clean and dry before starting the doodling.
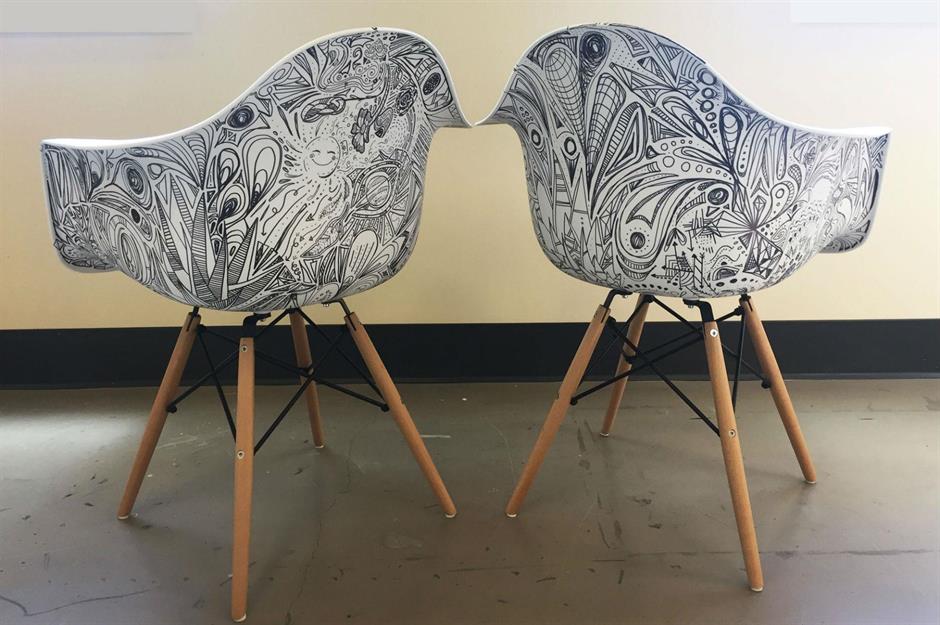
Also, ensure that the ink won’t seep into other surfaces in addition to being drawn over the chair’s surface. Sketch patterns or draw outlines for your designs- trace them out beforehand to ensure you love the look, then doodle away until they look just as you want.
6. Bring sunshine to your garden set
Give your garden a fresh and exciting look with this metal furniture set. You may find a good deal for just $54 on eBay if you need a set. The chalk paint will add beauty and brightness to dull items while protecting the elements for all-year use.
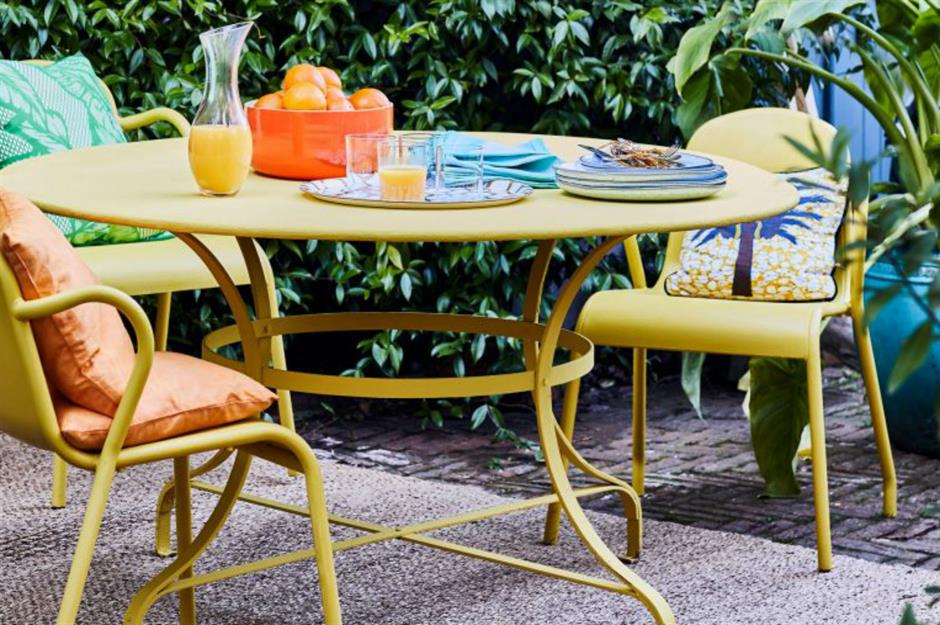
Give it a quick sanding down, clean it up and then apply the first coat. Wait at least a day before adding another coat. Lastly, use a water-based polyacrylic varnish to avoid weather wear and tear and make these last longer.
7. Experiment with a bold bed frame
You can make your bed frame look more attractive than ever with a bit of paint. A great way to spice up boring old wooden furniture like beds is by applying chalk-based paints. Choose a bright paint color to go bold and create contrast with vibrant curtains.
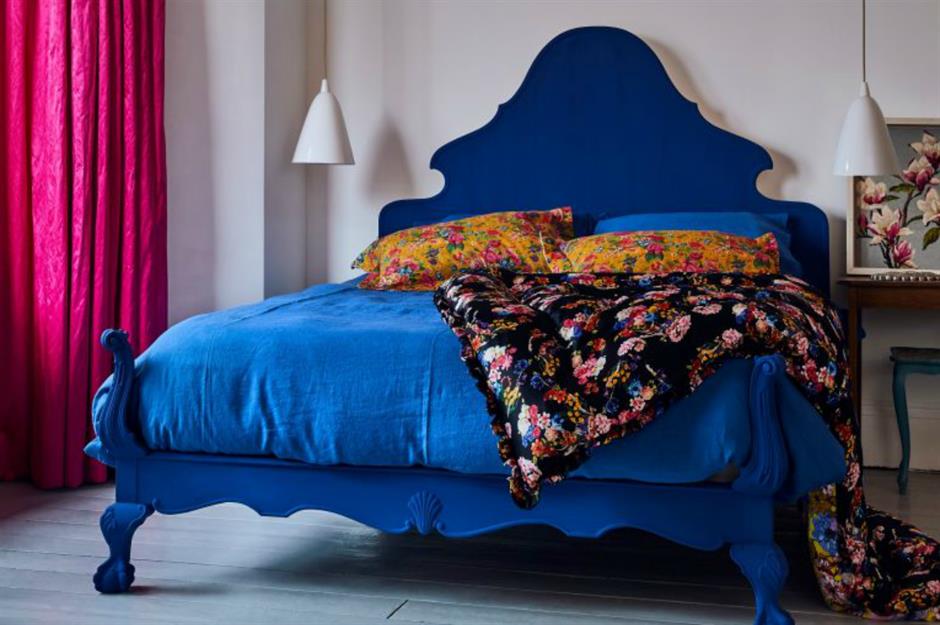
Chalk paint applies easily onto surfaces without needing any sanding or prepping. You should do just two coats for this project which takes around a day, including drying time between each coat of the paint. It would help if you sealed it with matte wax.
8. Delicate engraving to add elegance
Go the stylish route with delicate engraving if you want your home to look elegant. Woodburning, or pyrography as it is known, can be used to add personalized details, such as this example on an old wooden chair. Moreover, you’ll create one-of-a-kind art with this.
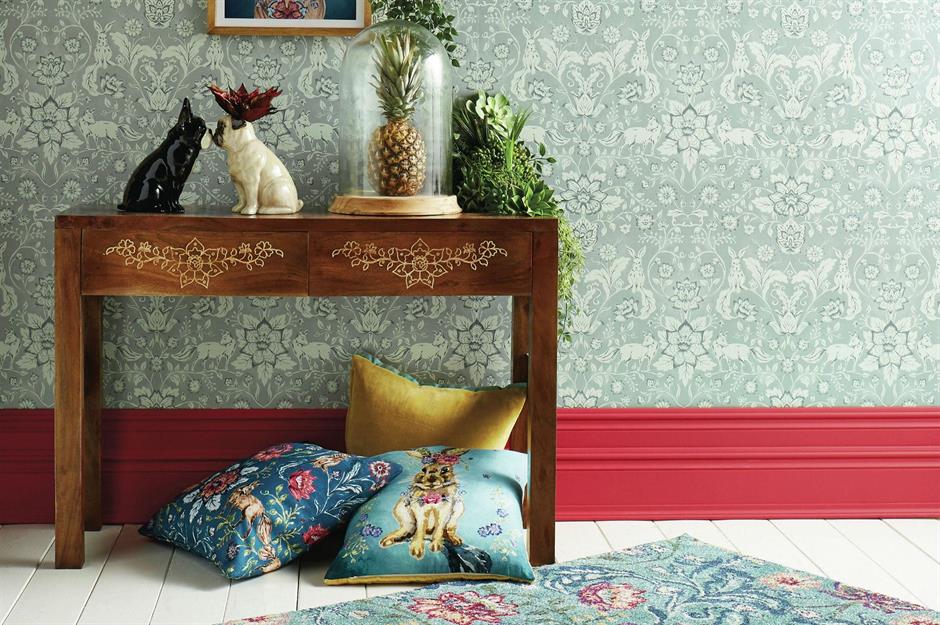
You could stencil patterns onto your furniture with some creativity and skill, like these intricate designs. Find online tutorials to guide you on how to engrave design precisely. It may just look intimidating; however, it is easy enough for beginners as well.
9. Create a shabby chic suitcase table
If you’re tired of your dusty old suitcase being useless storage, why not turn it into a stylish hall table? All that’s required is to attach hairpin legs to the case like these used by House Of Wild Fang for a similar DIY.
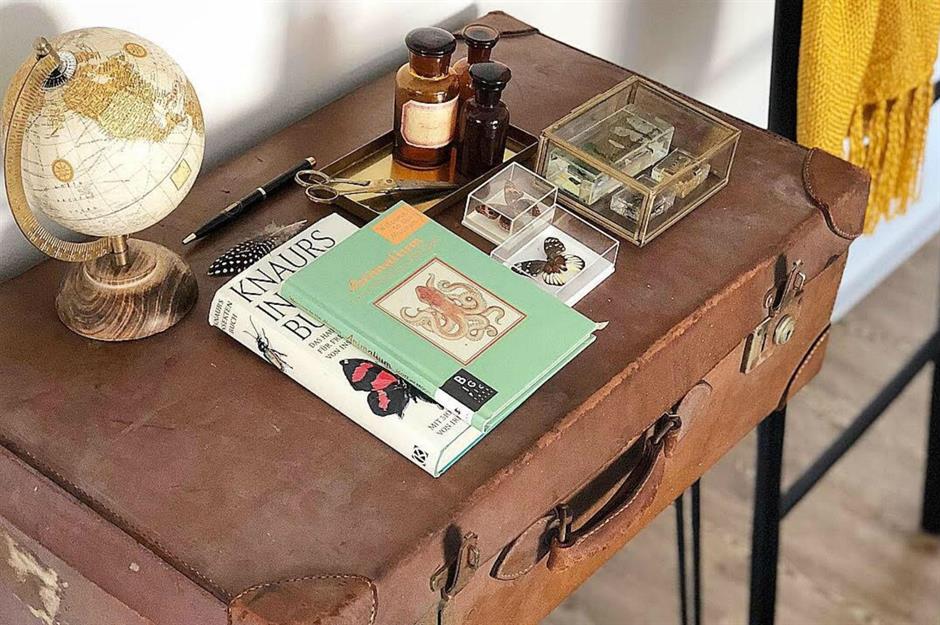
Depending on how sturdy and well-made the frame is, you may choose to reinforce the inside of the suitcase with an MDF sheet. Once done, this project will be functional. It’s perfect for adding flair while also providing handy furniture in any interior design scheme of the home.
10. Glamorize the chest of drawers
Give your Ikea Rast chest of drawers a facelift with this coral chest inspiration from How to Nest for Less! This project is perfect for those with simple Ikea drawers that you want to decorate. Also, before painting, notice how coral is balanced with white decor trim.
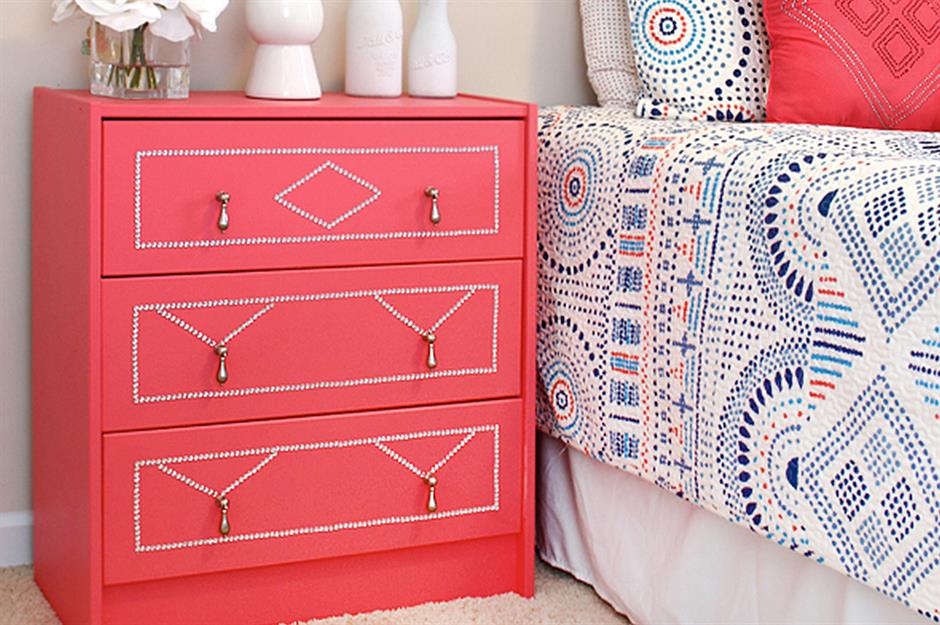
Painted in bright colors, gemstone details, and pendant drawer pulls will make it glamorous enough without spending too much money on furniture again – because who doesn’t love saving cash when celebrating life’s little moments? This might become your new piece of furniture at home.
11. Spice up the dresser drawers
You may make your own candy stripe patterns on the insides of dresser drawers. A hint of pink in any room is always easy to do without taking up too much space on shelves or dresser drawers. With this quick craft idea, you can upgrade your dressing drawers into something new.
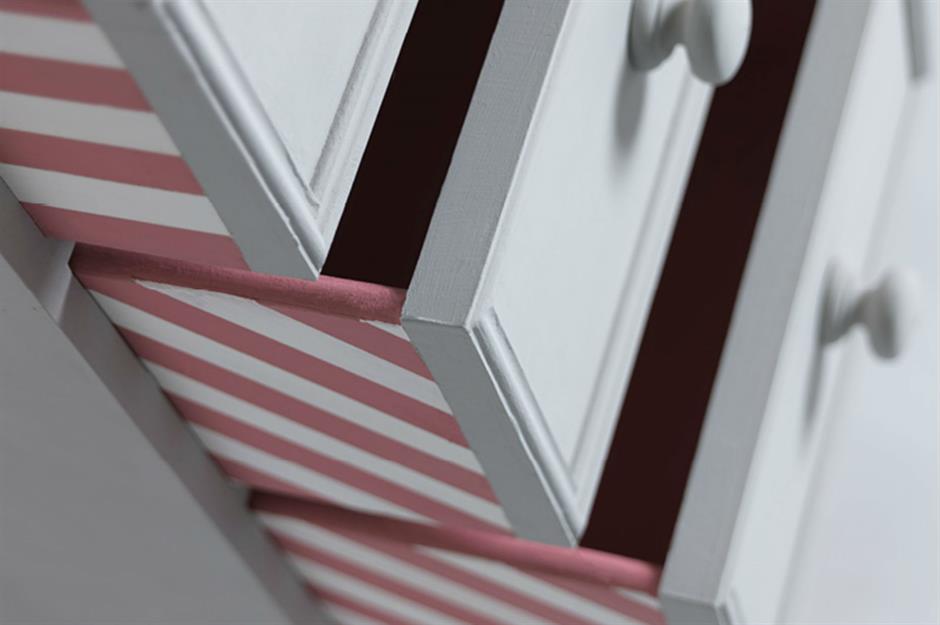
Use masking tape and a ruler as guidelines along each side, then paint over it. Apply chalk paint in a straight motion to avoid streaks. Let it dry thoroughly overnight between applications if possible. You may also try leaving it for at least two days for the paint to cure.
12. Wallpaper on the dining table
With its worn surface, this dining table had been on the brink of becoming trash. But instead, Pillar Box Blue transformed it with a simple technique that took little to no effort. First, they sanded down all surfaces to remove any dirt or rust.
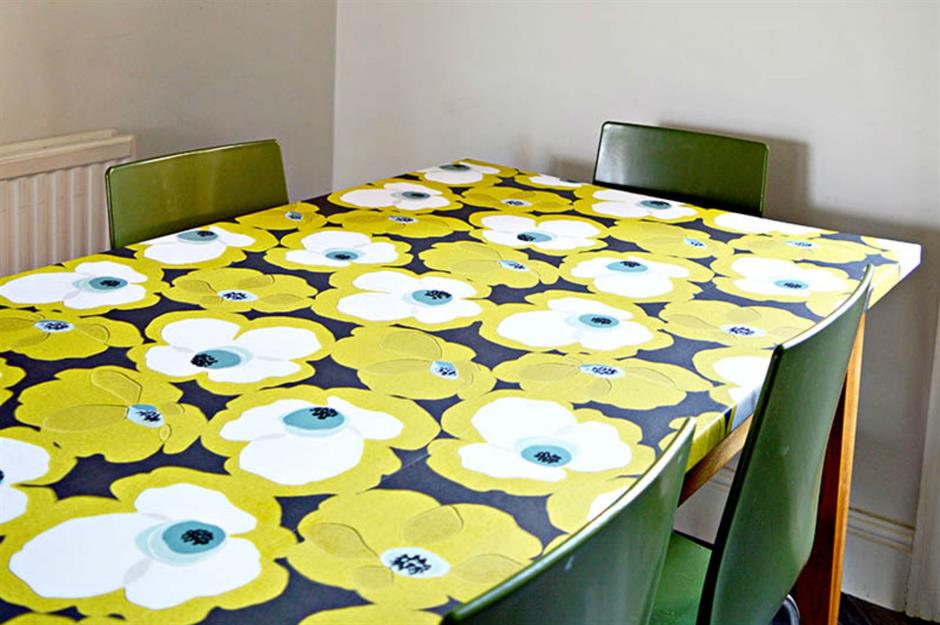
Then after wiping off any residue, they applied a bright, vibrant wallpaper design over the top. Finally, two coats of clear varnish were added, which will protect against stains and wear and tear throughout the use. A simple DIY made it look gorgeous.
13. Rose gold desk upgrade
Bring in on-trend metallics without compromising style by using the pretty rose gold color that is sure to warm up any room. Adding this color will be easy on the eyes and won’t look too bright while you are trying to focus on your work all day.
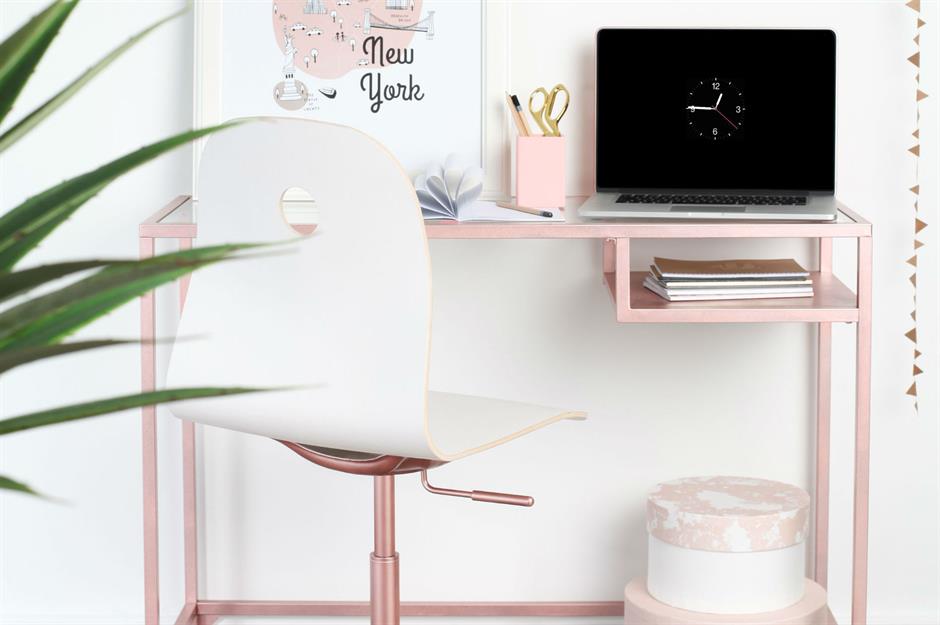
The shade and quality of this Rustoleum paint will help you create a new look for your metal desk or another furniture piece. Moreover, this will add to a pastel theme that is very calming for any workspace or living room.
14. Paint a bedside table
Stick-on papers, a small pot of paint, wallpaper, and PVA glue are all you need to give an old bedside table a new lease of life. Find a piece to upcycle at yard sales, Gumtree, or eBay if you don’t have something at home to work with. Sometimes, you need to go this route to find something old and exciting for DIYs.
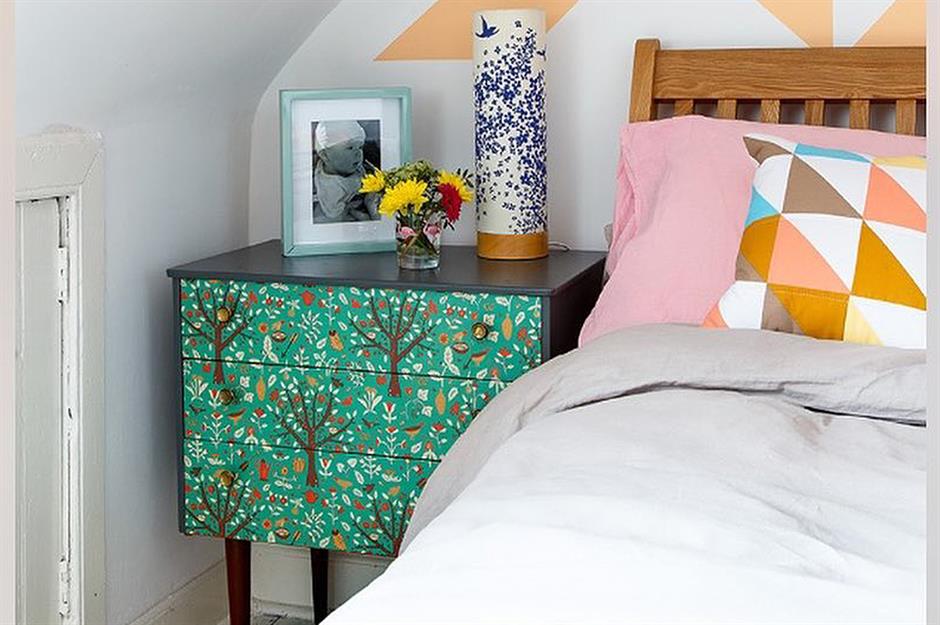
All my materials are around less than a few dollars, including the paint, so there is no high cost out of pocket when starting upcycling projects at home or office space. Pick your favorite colors from among the many options available and start painting.
15. Mismatch patchwork a footstool
A long day outside may make you tired. You need something simple but stylish to put your feet up after work hours. And we have exactly what you need—an old footstool covered in patches of your softest t-shirts. Two birds, one stone!
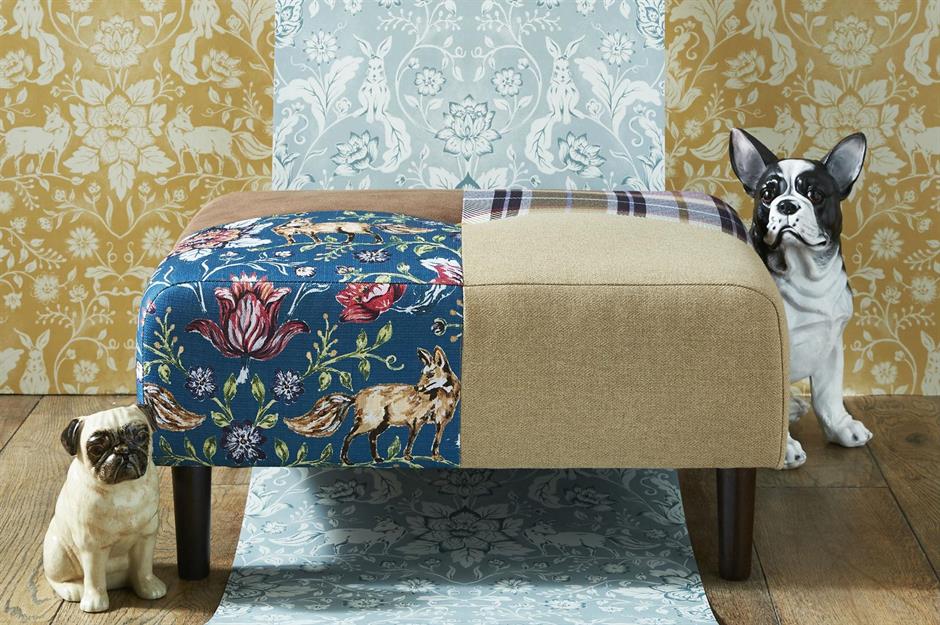
The idea is to use four different fabrics for the patching to add a shabby chic vibe that’s still charming. You may choose similar or entirely different textures. This piece will give an overall country look and feel soft against the skin.
16. Add fun colors to the bedside table
Make your bedside table more interesting with some paint. Head to a second-hand store for those who don’t have old furniture. This vintage sideboard is a charity shop find for only £15 ($20). It was easy to revive it with some paint and patterned wallpaper.
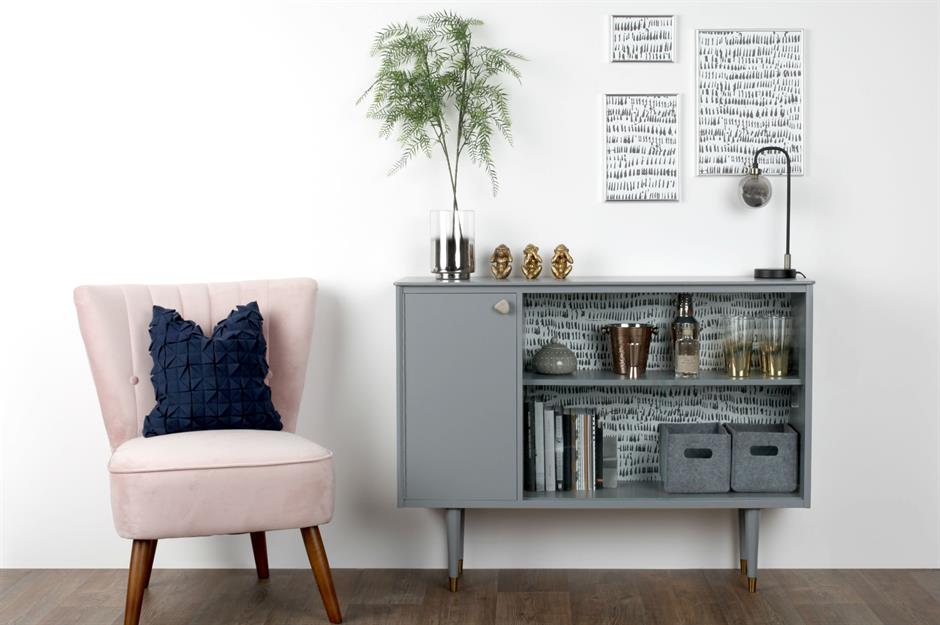
You may give your table a similar up-to-date look by painting over the surface and then applying patterned wallpaper. For paint, use satin finish furniture paints – they won’t need priming. Add self-sticking colorful wallpaper, so it’s easy to work with. Get creative by mixing colors or going bold on one side while keeping things simple on the other.
17. Metal bed frame for fancying bedroom
If you’re looking to spruce up your children’s bedroom with an old-fashioned Victorian charm, then there is no better way than the classic metal bed frames. With so many exciting styles available, it can be hard to know which one will best fit their personality.
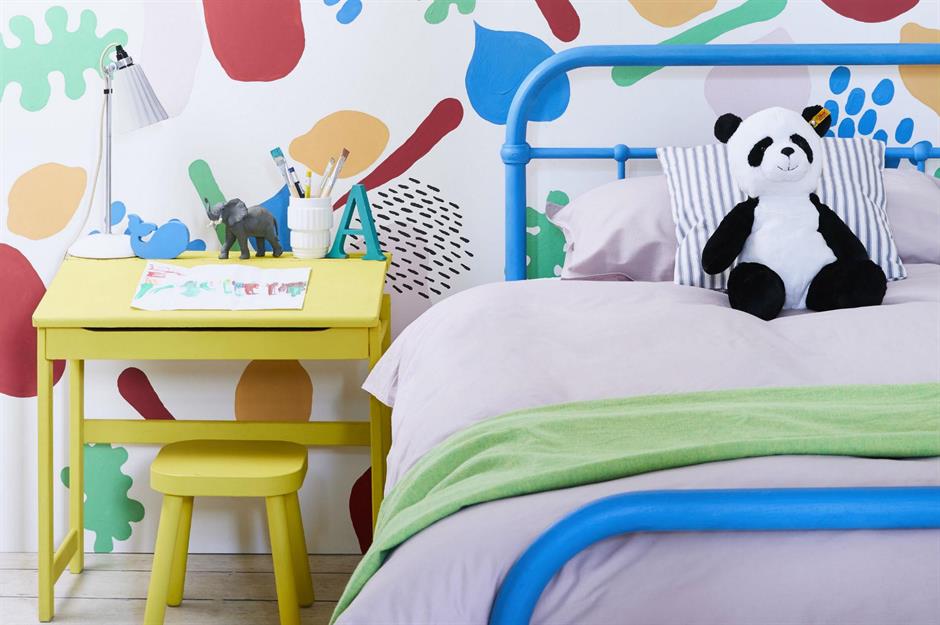
Choose a fancy frame and paint it in a warm shade that’s predominantly a part of the room. This will create a monochromatic and royal look. You may have to sand the surface before adding primer and paint. Use spray paint or chalk paint to dazzle the frame.
18. Add new handles
There are countless ways to spruce up old pieces and retro furniture with a bit of creativity. One easy modification is changing the old handles from your favorite retro furniture, or any vintage finds you wish to upcycle. You may choose statement pieces to add some style.
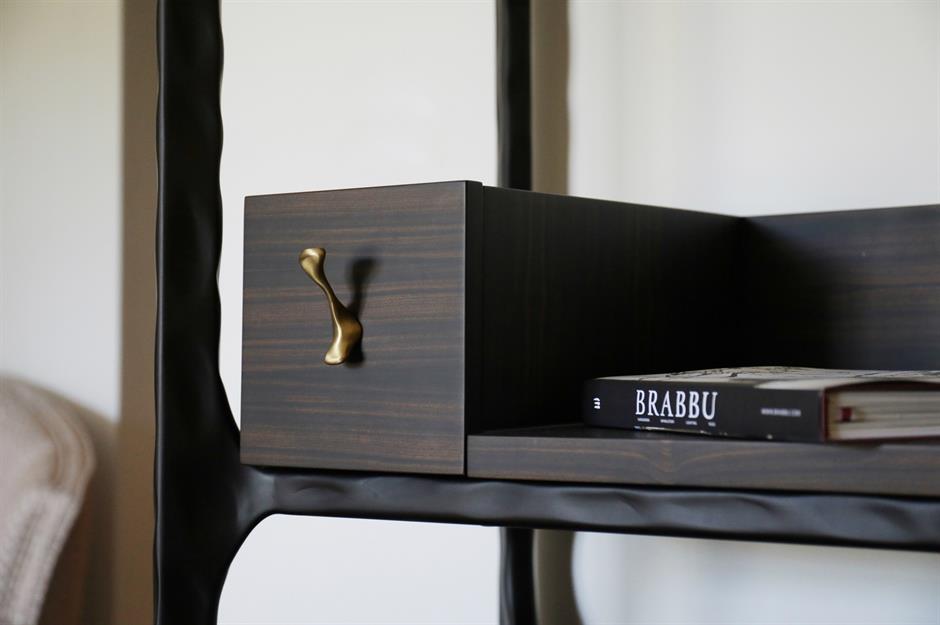
If you’re looking for more variety in design, then porcelain options will be perfect. They come ready-made, so all that’s left to do is install them with some screws. PullCast also offers polished brass handles if you’re going for a rustic theme.
19. Freshen up the play furniture
You can give your kid’s playroom some new life by upcycling old furniture replica toys. Blogger The Oto House tested out her full-size kitchen remodeling plans using IKEA’s Duktig compressed play kitchen set. This offered her the idea of using plywood and ribbed wood for kitchen upgrades.
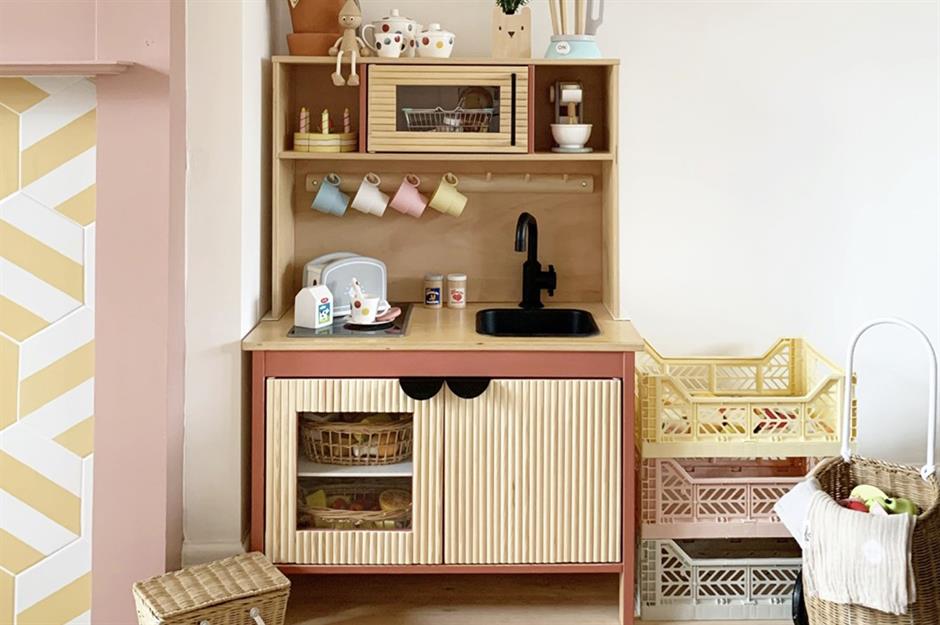
She covered doors throughout this mini version with the ribbed wood she bought at Home Depot. In addition, she added plywood as a splashback over the stove. Then she spray-painted the sink, tap, and handles in black to add a modern touch.
20. Zodiac art for an old side table
Let your creativity shine! If you’re feeling feisty, paint a side table with the galaxy’s stars. You can use painter’s tape and mark out geometric shapes for an old-school look or maybe something more modern like your zodiac sign.
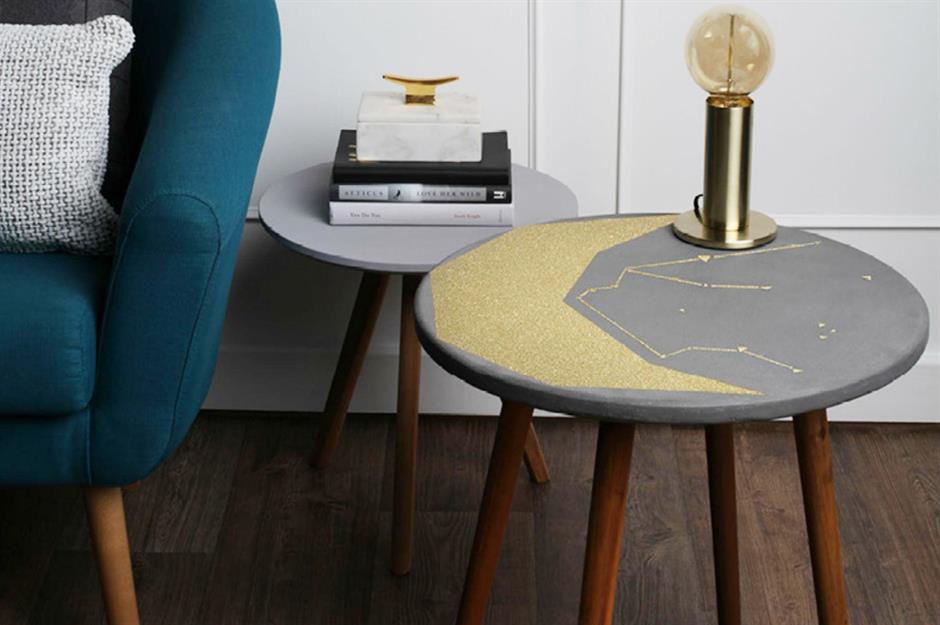
This Aquarius design on the table will inspire you to add the design in either shimmering gold or silver paint. You should use masking tape to ensure the plan is perfectly outlined on the table before painting it. Let the paint dry before removing the tape.
21. Watercolour treatment for wooden chairs
Give your old wooden chairs a watercolor treatment to give them a little color. The soft graduated hue paint is an excellent alternative for those who do not wish to add any bold neon shades. These colors add sensitivity in contrast to dark wood furniture sets.
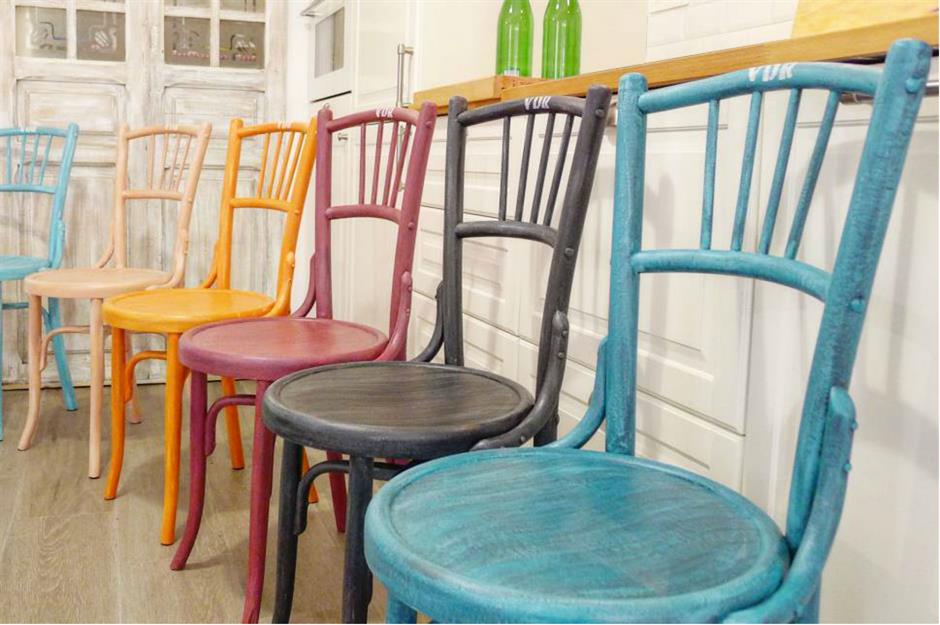
You can experiment with designs on this type of piece by painting half on one side while leaving another untouched. Playing with these two tones will look on-trend and will still offer the original texture and color of the chairs in some parts.
22. Add patterns with washi tape
The easiest way to update furniture is with washi tape. Thanks to its self-adhesive backings, this removable craft supplement adds personality while staying in place. Moreover, this is a quick fix that you can apply to any piece from an old drawer or cabinet hardware.
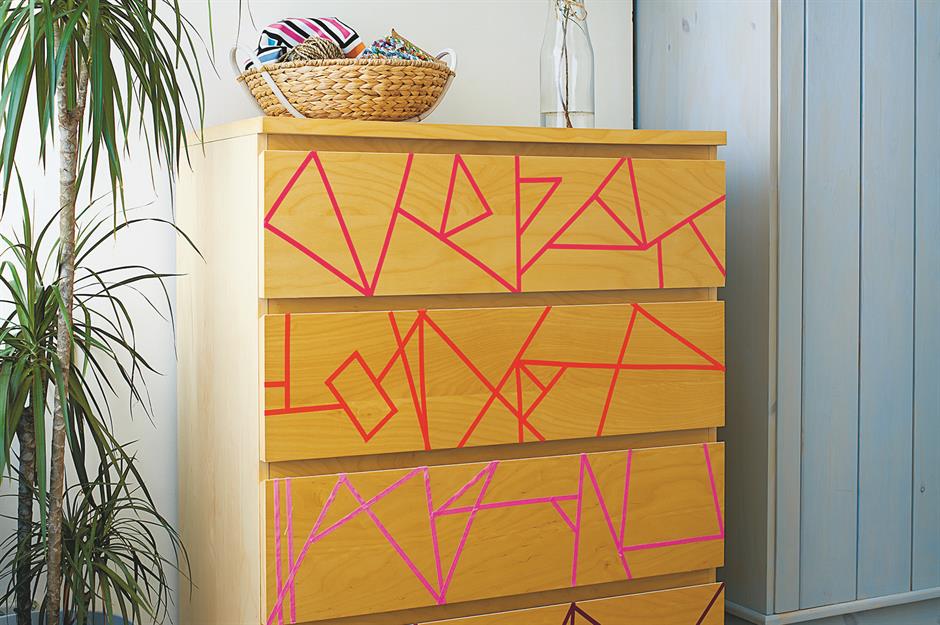
The steps are simple and fast to finish. Stick different lengths of the tape from one side onto your furniture. Cut along the edge where it meets itself so you have straight lines. This makes them look more polished and appear professionally done.
23. Use chic floral fabrics to upholster
Do you need to spruce up your old furniture? Try your hands at upholstery with a twist of fresh and floral. Give those boring armchairs some new life by covering them in fashionable florals. This will spruce up an old armchair with minimal supplies and effort.
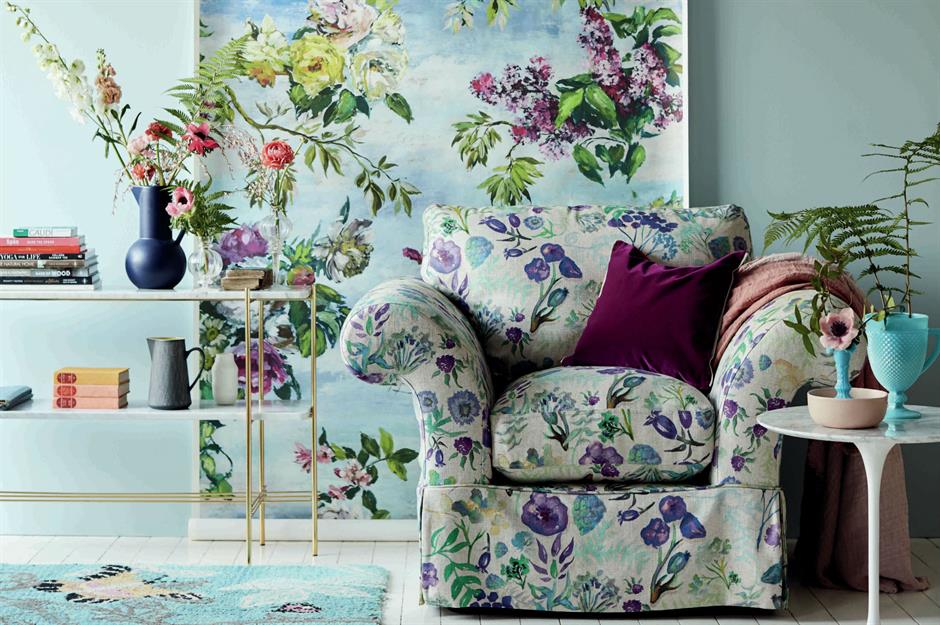
You can either sew on an extra layer yourself or take it one step further, grabbing scissors for this job and covering the couch and pillows separately. This may take longer, but the finished floral chair will be worth it as you’ll be working on it from scratch.
24. Upgrade dining chairs with maps
Pillar Box Blue has given these old wooden school chairs a unique, intriguing makeover. You can have your favorite-looking seat transplanted into something with personality for a minimal cost. The project entails taking apart the frame of each chair and sanding it before applying PVA glue.
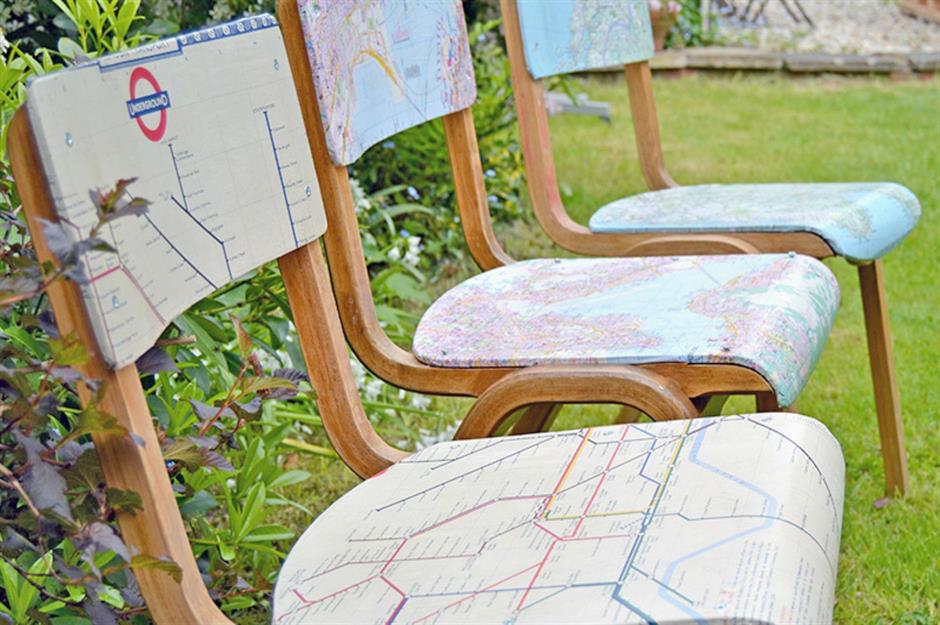
Stick maps from around the world over the top of the chair and carefully decoupage the wooden fronts. Once this is dry, add coatings of protective varnish so that everything is set. This will prevent any dust or damage to the chair’s surface, and you’ll have these around for longer.
25. Revamp a vintage sideboard
This sideboard has been transformed from drab to fab with just a few updates. The rich navy blue paint and hints of its original wood give it an updated classic and modern look to add glamor to any room in your house.
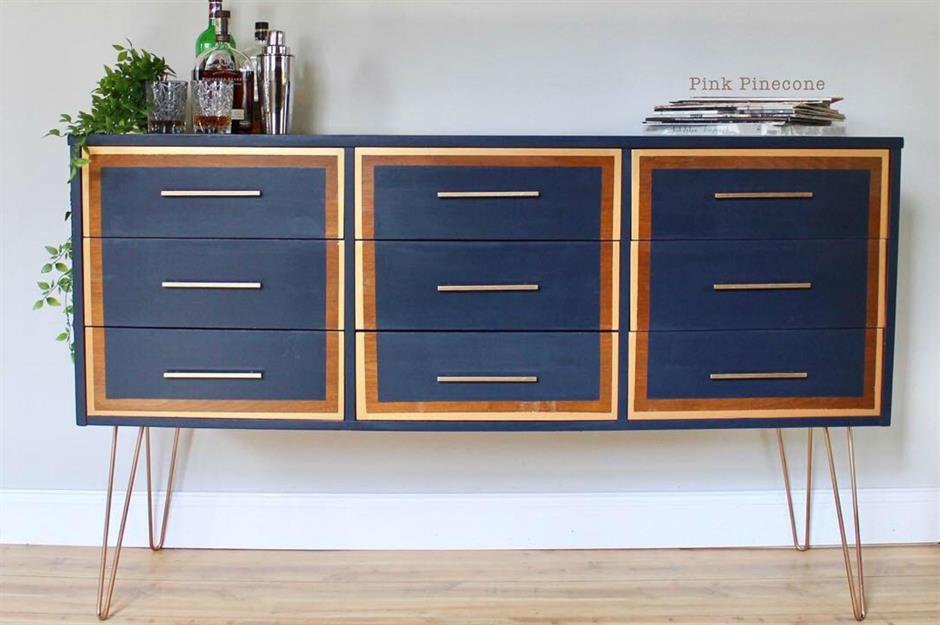
Even after adding paint, the original wood is showing up nicely. Besides, @pink_pinecone’s has worked on replacing the old worn-out legs with industrial gold hairpin ones, which add a sophisticated look. Also, the sleek metal bars serve as new handlebars.
26. Fake marble with sticky-back plastic
Marble is a timeless material, but there are other options if you want to get the look without breaking your bank account. It takes some sticky-back plastic and any surface such as chairs, tables, countertops, and bookcases. Moreover, there are many beautiful designs in between.
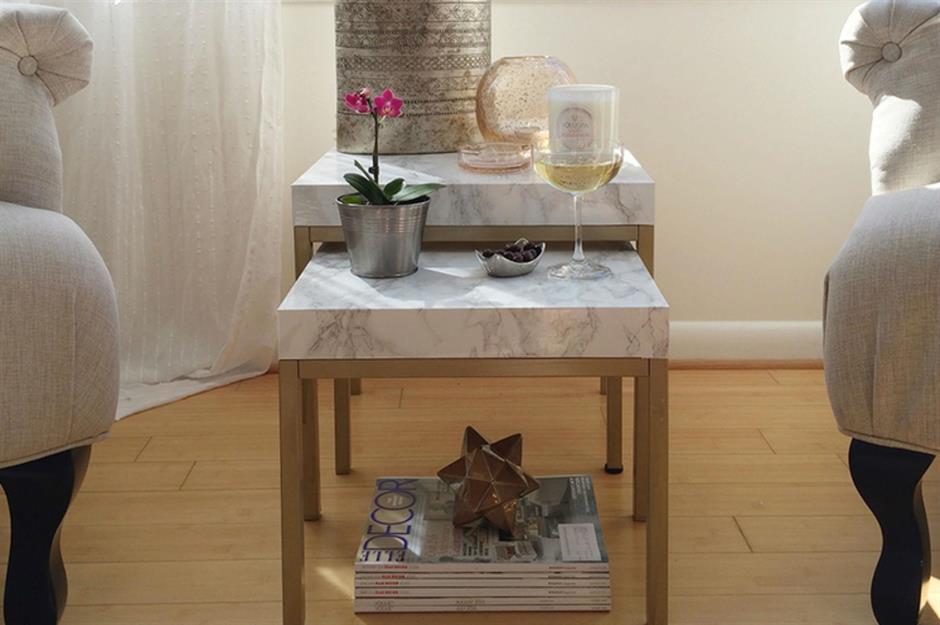
There is something for everyone in these designs- from sleek black and white shades of sticky paper to vibrant options. So you may try out different combinations for your home decor. When applying sticky paper, go slow to prevent wrinkles and air bubbles.
27. Balance decoupage with dark tones
The Conscious Cubby team transformed this mid-century sideboard by spray painting it in a deep blue shade and finishing with a gold palm leaf print decoupaged on the surface. They also covered the cabinet’s wooden legs in DIY decoupage to match the pattern.
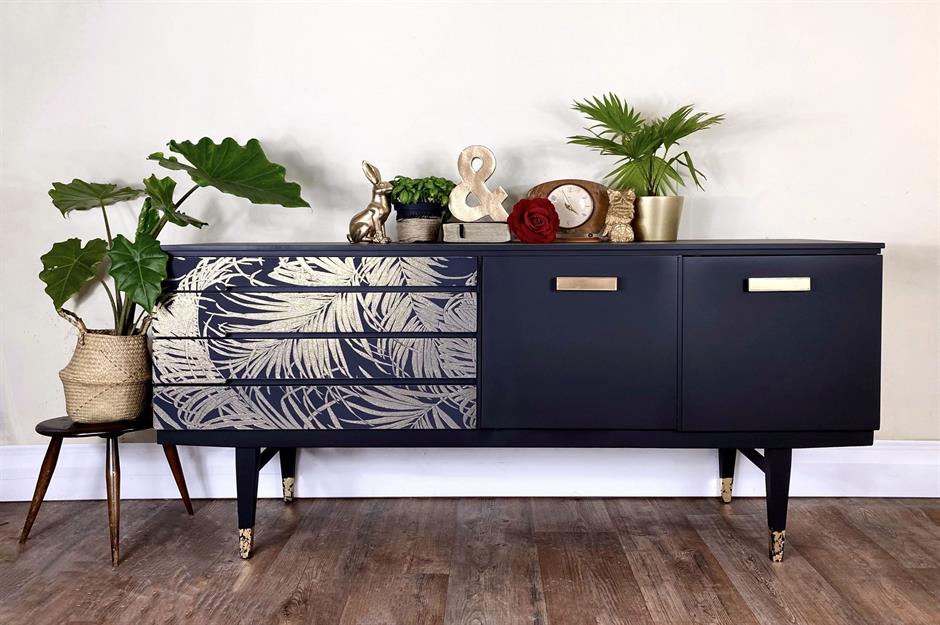
Be sure to choose paints carefully before undertaking such projects, so they match what you’re trying to achieve. Get all the supplies that you may need to execute this in advance. Enhance the balance of blue and gold by adding gold decor and green plants to the space.
28. DIY headboard upholstery
Upholstery of a headboard might sound like an overwhelming project, but it’s pretty simple. You’ll need to take out the old fabric from your bed frame before starting, which sometimes gets tricky. Be careful while removing the headboard, or you may ask someone for assistance.
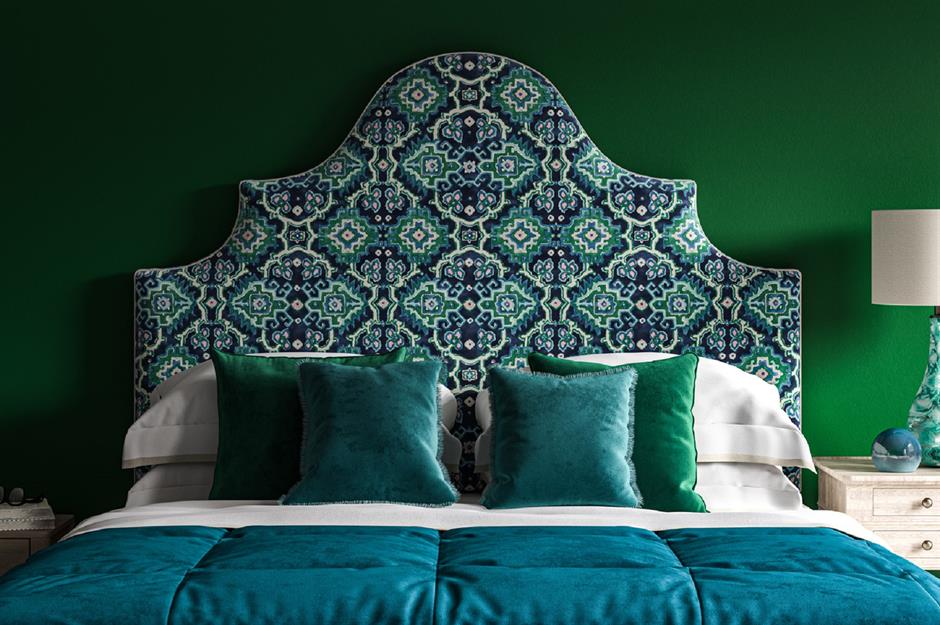
Once you’ve sourced some one-inch foam and wadding (the material used for padding), cut them both out in order, then glue or staple them together using a staple gun. Make sure all pieces are tight against each other, so there aren’t any gaps when finished fastening down their ends.
29. Bring home the bold graphics
When looking for a quick and easy way to update your bathroom, consider lofting up old furniture with some fun new patterns. This vanity unit was initially an antique chest of drawers that’s been given new life as it now features geometric paint effects in bright colors. The minimalist design speaks volumes here.
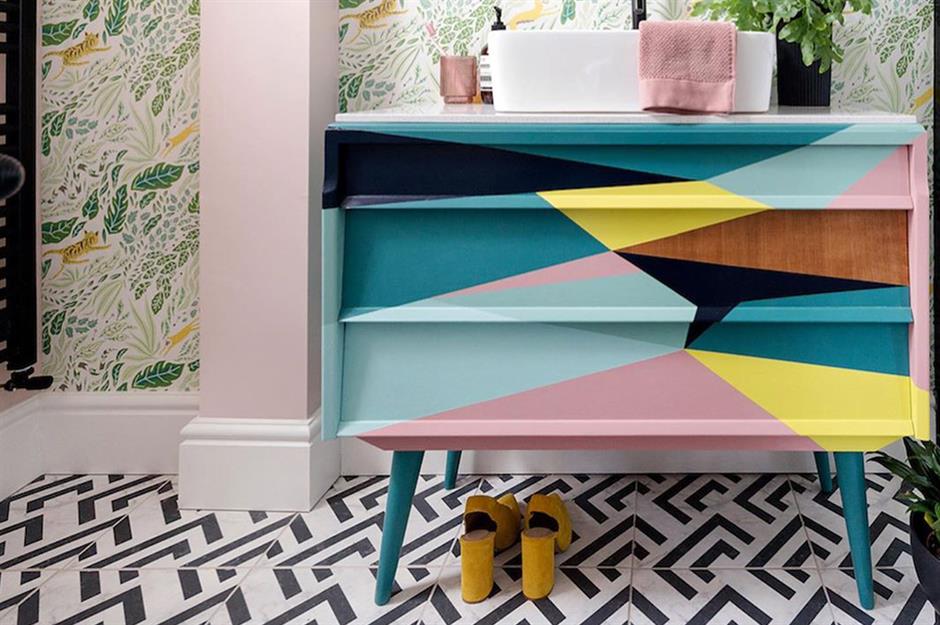
A washbasin has also been added to the top so users can enjoy functionality while getting contemporary flair from their space without having too much going on visually. The addition won’t require much effort besides plumbing. All materials used are found at local flea markets or garage sales, making up an easy DIY project.
30. See the magic of rattan
Gone are the days when you need to break your bank for interior design trends. The team quickly transformed this stunning cabinet at Furniture And Choice by simply removing and replacing the inner door sections with a roll of cane webbing.
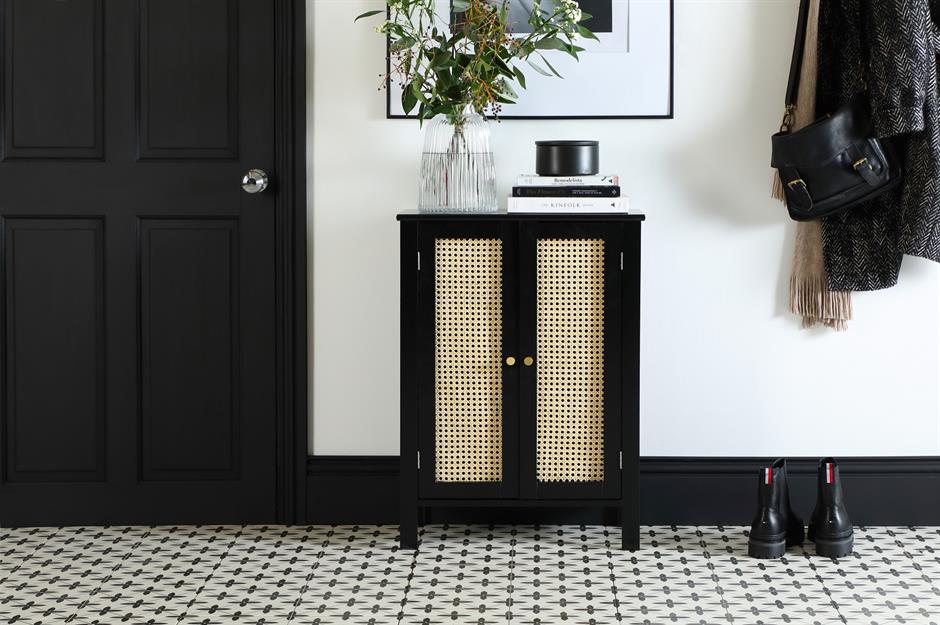
They also added a deep black hue finished off with chic golden handles. You may keep this in your bedroom or a hallway and add some decor items to spruce it more. Overall, this furniture transformation is not only beautiful but also affordable.
31. Try lively leopard print for your wardrobe
With its bold leopard print and lively design, this is a great way to bring some personality into your wardrobe. You may take your closet from boring to fabulous in no time. Creating it is pretty simple, with just layers of paint and wax.
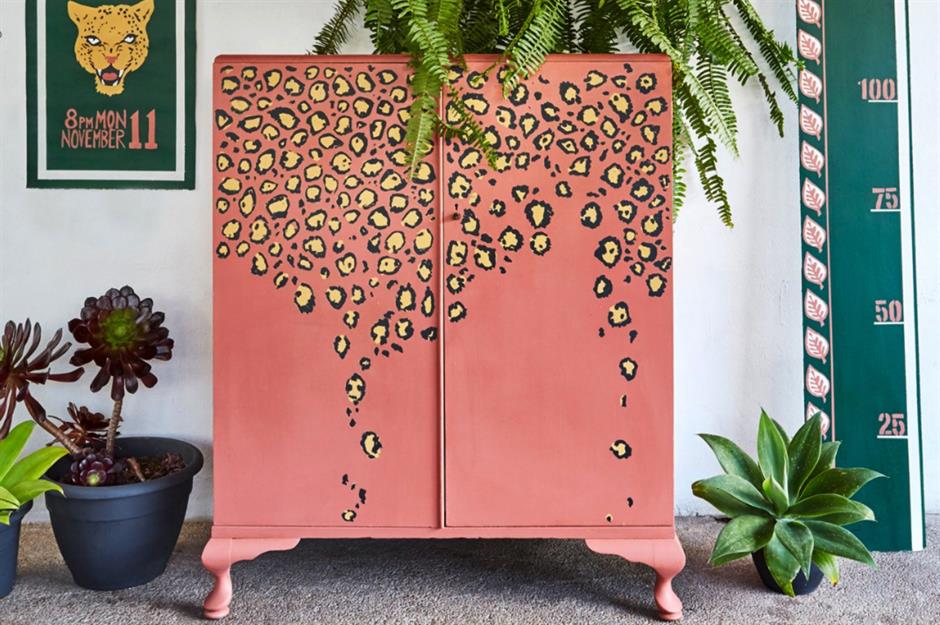
The pink and leopard print are an unusual combination but go well together. This unique upcycling project created with traditional batik printmaking techniques is the perfect way for you or someone else to have fun changing furniture styles quickly without much cost.
32. Upgrade a second-hand dresser with an ombre theme
When blogger Medina Grillo was faced with the task of upcycling a charity store find, she knew that it would be an exciting project. But her first plan of using stencils didn’t turn out as expected, so she tried something else that looked way cooler
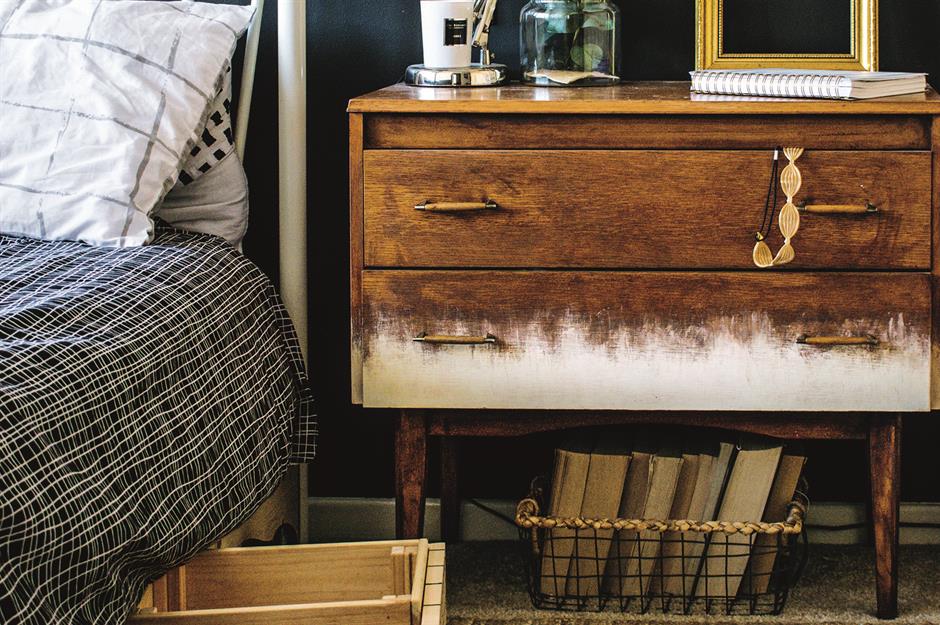
After sanding off the paint from this mid-century piece, she went ahead with staining two-thirds of it with dark wax. Once it dried, she used chalk paint on the bottom drawers with a dry brush technique to add an ombre effect.
33. Revamp the bookcase
We all know how boring bookcases can be, so why not spice things up with some paint? This idea is sure to convince you of its worth. If you’re looking for a way to make your room more cohesive and exciting, consider painting both walls and furniture in matching colors.
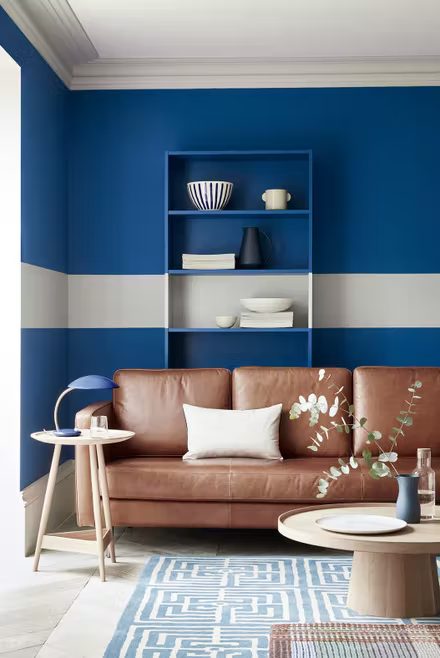
You’ll need two different shades for this project: one light blue (azure), which matches well against whitewall or cabinet panels. Another medium-dark color like royal blue would also do nicely here, depending on what kind of mood you want your space to evoke.
34. Art Deco makeover for the bar cart
Bar carts are a fantastic way to add extra storage and style to your kitchen or bar area. If you’re looking for something unique, this second-hand cart from Facebook Marketplace might be what you need for your next DIY inspiration.
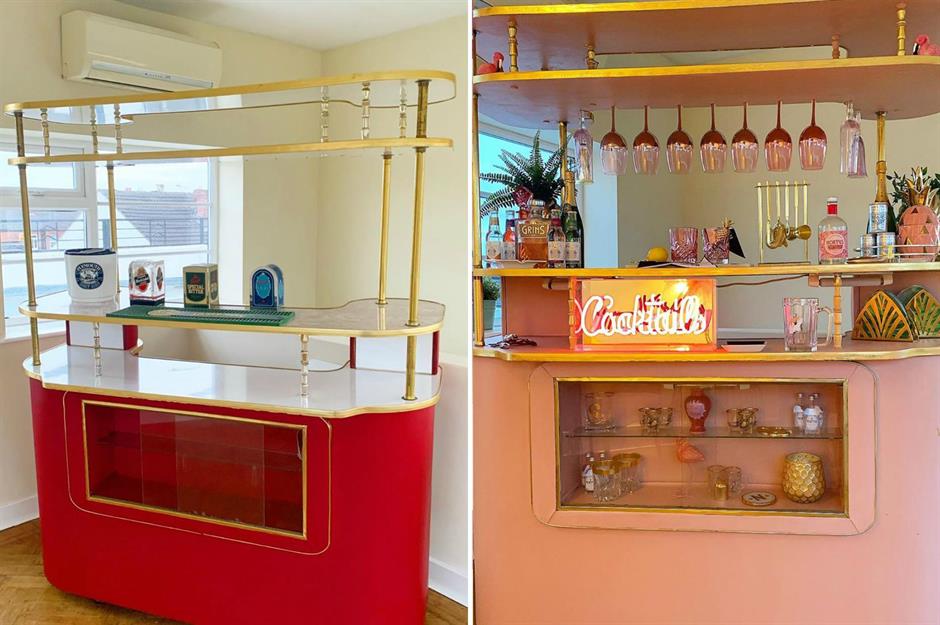
It only cost £300 ($406) for Siobhan Murphy, and we assure you it’s worth every penny with its elegant design straight out of 1920s America. After a splash of Dowsing & Reynolds baby pink paint and gold leaf countertop, the Art Deco theme came to life in this piece.
35. Bring the back garden bench to life
Sometimes, you need to give old things a new lease of life. A garden bench is no different. If your family has been using this spot for generations before moving into your dream home with plenty of seats and space inside, don’t ditch it.
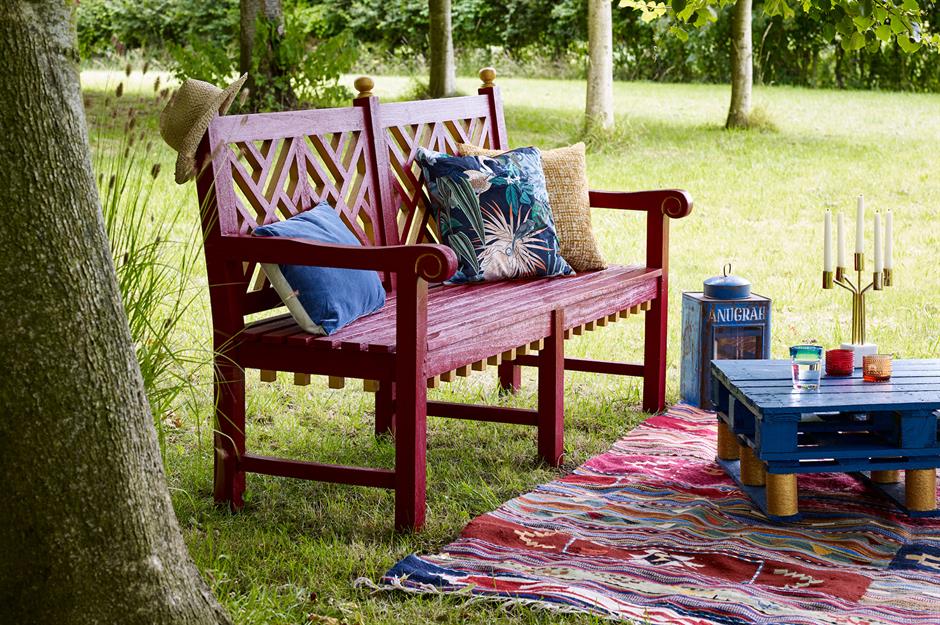
Bring back the rich jewel tone color on top while also giving all other details (like fretwork) to add some contrast. Once the paint is dry, add cushions and a coffee table to the setting and enjoy your evening on the bench.
36. Turn an old table into a farmhouse style piece
If you think that solid oak is the only way to get farmhouse style, then White Lace Cottage has some good news for your taste buds. With just paint and creativity, they transformed this plain table into something truly unique.
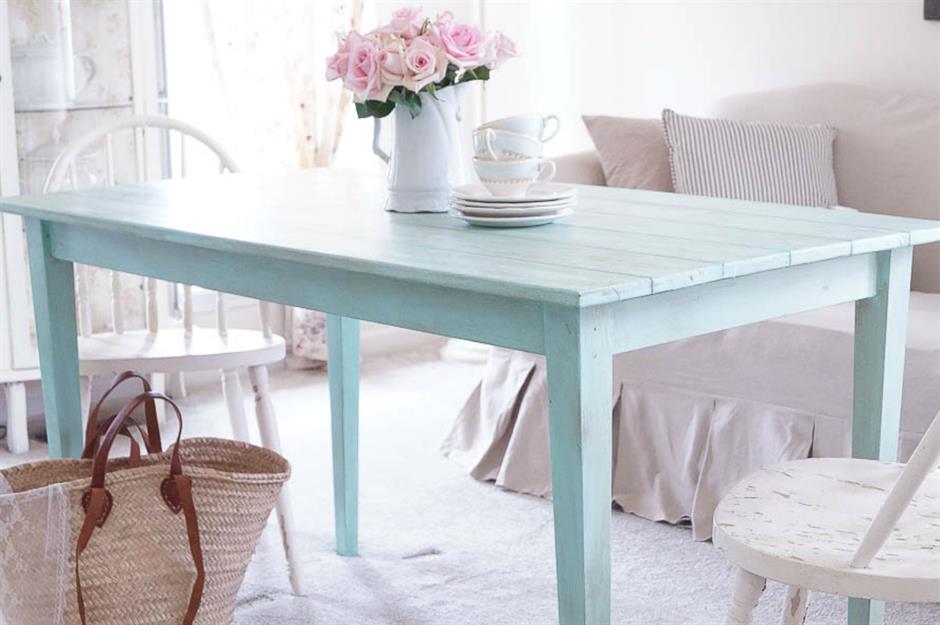
Apply pale blue acrylic to the table and create a division of the space into faux planks. You may use painter’s tape to do this. Leaving one plank, paint the alternate one with contrasting grey-brown paint. Once the paint is all dry, carefully remove the tape.
37. Get artsy on your coffee table
A freehand painting is a perfect way to update your mid-century furniture with little expense and quick results. This classic style is an edgy new look with grey hues! You’ll like the edgy contemporary look of the table using the combination of grey and brown.
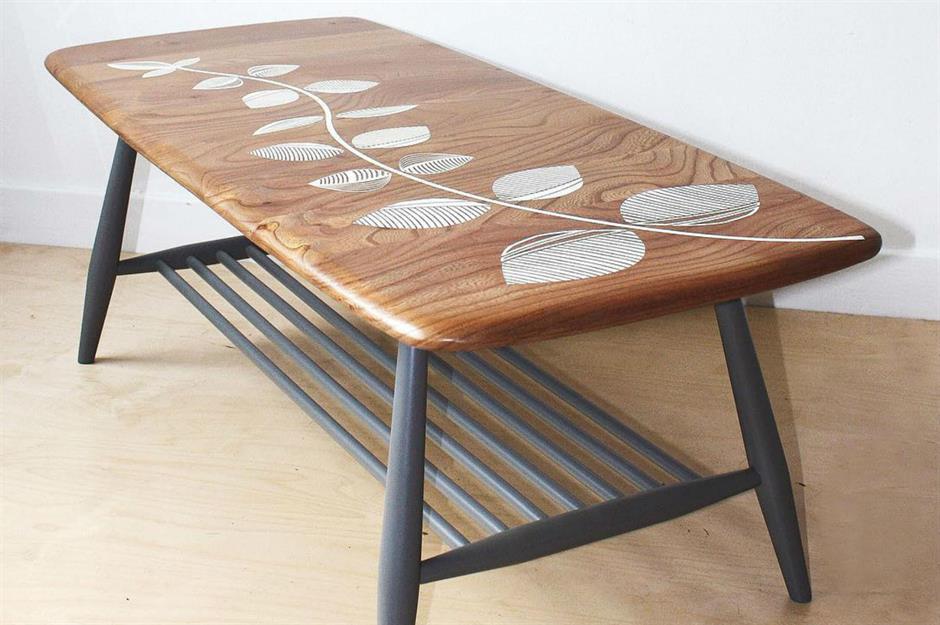
Start by sanding down any rough areas where paint might have been applied recently, then clean thoroughly before starting. You must take care during all steps to avoid any mistakes. Use latex or acrylic paint to add motifs to the top of the table. Once the paint is dry, add a clear varnish.
38. Turn your old tub into something vintage
What if we told you there’s a possibility to give your old bathtub a new lease on life? You can revamp those outdated fixtures and make them feel as luxurious in their youthfulness or provide elegant decor for your bathroom within the home.
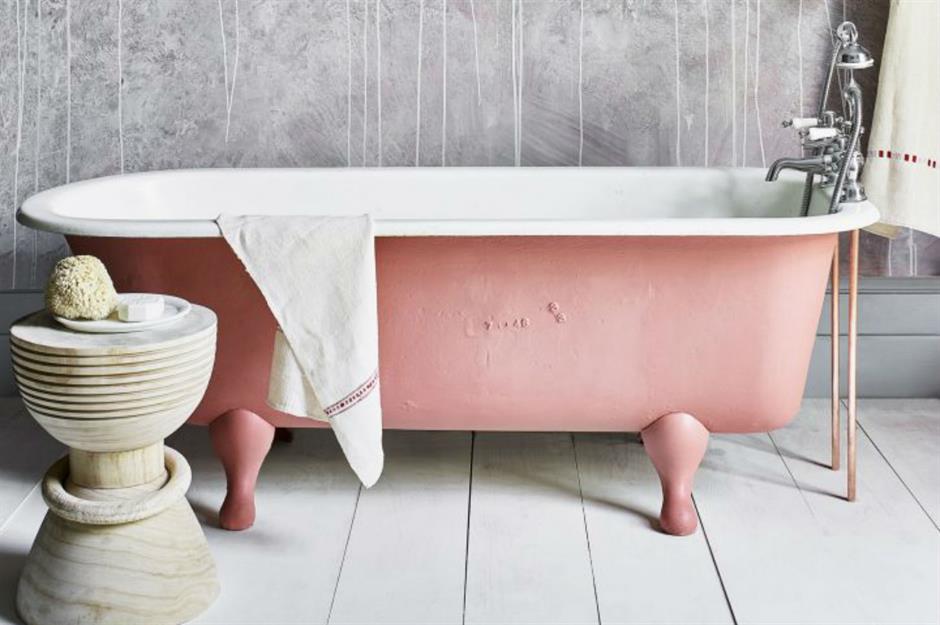
First off, note down which areas of the tub you do not want to paint and use painter’s tape to mask them. Now sand and wipe the surface. 2-3 light coats should be enough depending on how opaque the paint is. Add clear lacquer to finish.
39. Try a vibrant rainbow
What would you rather have, a dull brown patio set or one that is vibrant and colorful? @solaris100 has taken their creativity to the next level with this clever idea. All it takes are painter’s tapes and spray paints of choice. Note that the bright neon colors work best.
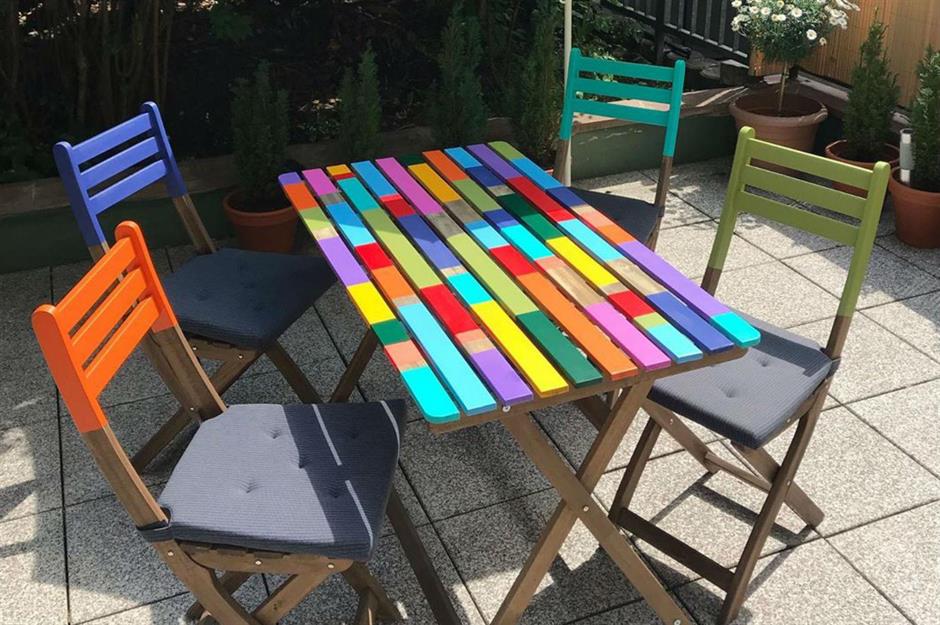
You may also use two-toned neutrals for the rainbow. Outline each section on your table with tape and add different paints to each section. Wait for a little before moving onto another layer so they will not blend too much, as they will not dry well.
40. Spray paint the folding metal chairs
Jazz up those garages by boosting your folding metal chairs! If you’ve got many of them hanging around the garage, give this project by My Fabulous Life a try. It takes one quick wash and dry before applying spray paint to cover seat pads in quirky patterns or colors.
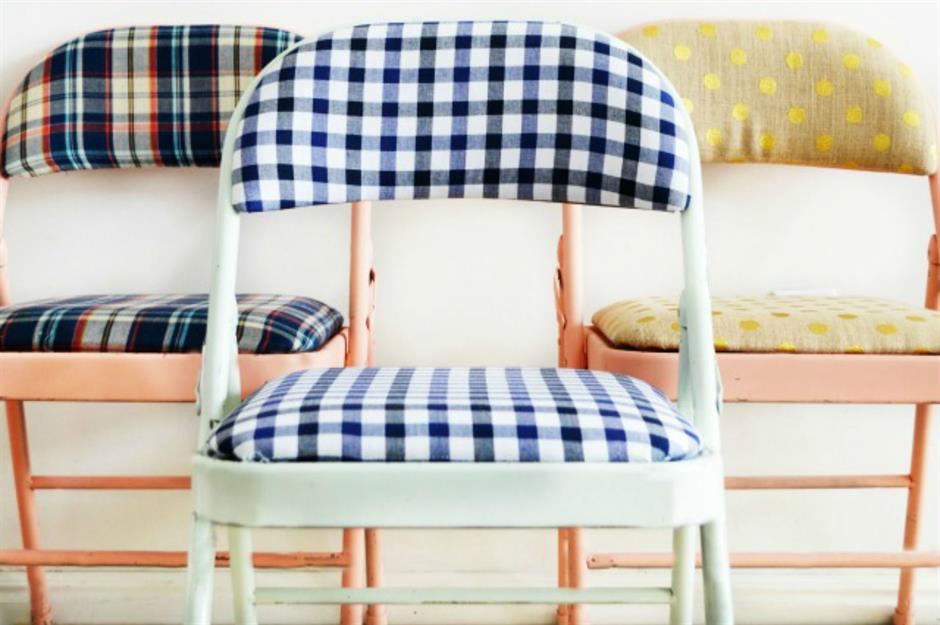
Get paint that will suffice for two coats for all the chairs, so they look nice and bright. Let the paint dry and add a sealant to ensure it stays that for a long time. You don’t have to store these in the garage anymore.
